Tuesday, August 20, 2013
Monday, February 13, 2012
The next step
This Simulator has finally made it to its home in Western Australia! Before it left we managed to squeeze in some testing with disabled users, and have since done some more, but more on that later. Firstly a few (decent quality) images of the final product:


We finally managed to prove the hoist worked as designed. While we did use it with wheelchair users though I was too busy at the time to take photos. However we did manage to take some subsequent photos and will have more of it in use in posts to come. Suffice to say it does exactly what we wanted it to!


Whilst the construction part of this blog as ended, I will be regularly updating it with how and where the Sim is being used. I will also be posting on the progress SoarAbility is making using not only the Sim, but the real aircraft as well. Soaring is already well under way, and I look forward to introducing you to those giving and receiving the training!
I would also like to say a quick thank you to my wonderful partner who has put up with a lot whilst I worked on this project.

STAY TUNED!
Wednesday, January 4, 2012
The Simulator is Finished!
Aside from a few small touches, the simulator is now finished!
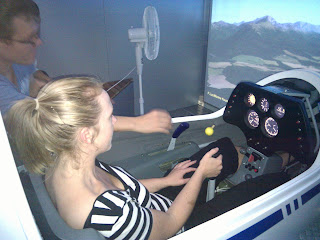
I have now had quite a number of people have a go on the sim, and the reaction has been very good! Everyone has had a lot of fun with both glider pilots and non pilots having a go. I have been especially interested in what existing pilots have to say, and the reaction has been positive.
With the hoist now working, the next step will be to let some wheelchair users have a go. This should be happening shortly. In the mean time, here are a few pictures:


Sunday, November 27, 2011
A quick flight!
After quite a bit of work, all the elements are together to make the Simulator flyable in a finished state! This includes finishing the stretching of the screen, hooking up the sound, and most importantly, putting up the block out curtain. This blocks out all the light making the projector image visible. It also help keep the cool air in and the hot air out (or the other way round depending on the season).
I finally had the opportunity to sit down and have a fly for an hour or two, and it is a whole lot of fun! The instruments and screen look great! The screen is big enough to give a real feeling of immersion, and the controls feel good (though I have set up the air-brake backwards and need to swap it!)
There are still a number of things to do, but this is probably the final milestone before completion!


Saturday, November 19, 2011
End of a long week!
I have been working on the Simulator for all of the past week so have been able to get a lot done. All the main cladding has now been finished on the ceiling and walls. The screen has been cut and hemmed ready for mounting with some more insulation behind it. The LED lighting is up and looking good, and the sound is working.


I also took delivery of the extra ramp. This extends the length and halves the gradient on the existing ramp, meaning that a wheelchair user can get into and out of the trailer unassisted. I have demonstrated this below. I'm sure an actual wheelchair user will do it with rather more skill, but it does prove the point!
The time is getting close when I will be ready to trial the Sim by letting people have a go! Stay tuned!
Monday, October 24, 2011
Roof panels and hoist rail
The roof panels are all up and so the hoist rail can go in permanently (big thanks to my brother for the help). I'm very happy with the result. From now on it will be a lot easier putting in panels since they are on the wall.
I have also had a chance to test the LED lighting which looks great!


I have also had a chance to test the LED lighting which looks great!


Sunday, October 9, 2011
Lifting Hoist and Cladding
It has been a while since my last post. Progress continues with all going well. With most of the flying aspects of the trailer being close to finished, current work involves cladding and hoist work.


The hoist mounts are now fixed into the roof structure and the hoist rail was able to be put up to test the positioning and function. The hoist sits out in the open to lift users, and can move to directly over the top of the seat and then off into the corner when not in use.

Once the hoist rail was tested, it had to come out again to allow the cladding to go up. Not the easiest job, but very necessary to keep the heat from radiating through the roof on those hot days. Plus it looks great once up, and will cut down on the ambient light in the trailer. The same will be going onto the walls and will give a much cleaner look, hiding all the cabling and structure.
I'm looking forward to seeing the finished look!
Subscribe to:
Posts (Atom)